cPanel & WHM offers a comprehensive server management solution. However, there are times when you’ll need to access your server’s shell to execute scripts or modify configuration settings via the command line. The most secure method for remote access is SSH (Secure Shell). An SSH client installed on your local machine establishes a connection with a daemon running on the server. SSH encrypts both the commands you send and the data the server returns.
Authentication is required when you log in via SSH, typically using your cPanel account’s username and password. Unfortunately, password-based authentication can be vulnerable. Users often choose easily guessable passwords. Furthermore, malicious bots frequently launch brute-force and dictionary attacks against SSH, consuming significant server resources.
SSH keys provide a more secure authentication alternative, utilizing public-key cryptography with a public and private key pair. SSH keys are less susceptible to guessing attacks. We briefly touched on SSH keys in How To Use PuTTY SSH With cPanel. This article will delve deeper into the workings of public-key cryptography, guide you through generating public-private key pairs within cPanel, and demonstrate how to authenticate with SSH using these keys.
What is Public Key Cryptography?
Cryptography is the science of secure communication. Cryptographers design secure systems, with encryption being a crucial tool. In essence, encryption scrambles messages to render them unreadable. You start with the original message, known as plaintext, and transform it into an unintelligible form called ciphertext. Decryption reverses this process, converting the ciphertext back into readable plaintext.
Symmetric encryption is the most common type. It requires a key and an encryption algorithm to encrypt a message. The key is a string of characters, and the algorithm is a set of instructions for combining the key and plaintext to generate the ciphertext. To decrypt, the recipient uses the same key and a related algorithm to transform the ciphertext back into plaintext. Only those with the key can decrypt.
Symmetric encryption requires the sender and receiver to share the secret key. What if you need to encrypt a communication when no shared secret exists? This occurs often on the internet. For example, imagine sending a secret message to a friend. You can encrypt it, but how do you securely transmit the key? Transmitting it over the internet risks interception and decryption by eavesdroppers.
Public-key cryptography, also known as asymmetric encryption, provides a solution. It leverages two keys: a public key and a private key. The private key is the only key capable of decrypting messages encrypted using the public key. Conversely, only the public key can decrypt messages encrypted using the private key.
To send a secret message to a friend, I request their public key. I then use it to encrypt the message and transmit the ciphertext. They then decrypt it using their private key. As long as they keep their private key secure, anyone with their public key can send them messages that only they can read.
Public key cryptography has two significant outcomes. First, it removes the need for a shared secret. Second, the holder of the private key can prove their identity by decrypting a message. If I encrypt “hello” with someone’s public key and they respond with “You said hello,” I’m certain they possess the private key. The relevance of this may not be immediately clear, but it’s the foundation of modern online security, including HTTPS and SSH keys.
SSH Keys: SSH Authentication with Public Key Cryptography
SSH key authentication uses the public-key mechanism to verify your identity when you connect to your server.
Here’s how it operates:
- You create a public/private key pair. You upload the public key to the server, and keep the private key secure on your local machine.
- When you SSH to the server, your client tells the server’s SSH daemon which public key you intend to use.
- The server generates a random string, encrypts it with your public key and sends the encrypted message to the client.
- Your client decrypts the message using your private key. Only your private key can decrypt messages encrypted with the corresponding public key.
- The client then hashes the decrypted message generates a one-way cryptographic function. The same string always produces the same hash. The client sends the hash to the server.
- The server also hashes its original message and compares the two hashes. A match confirms possession of the private key, and you are authenticated.
This form of authentication, when used with a securely stored private key, is robust and secure. It’s not vulnerable to brute-force or dictionary attacks. It also avoids issues stemming from weak password choices. Compromise of the private key, of course, invalidates the security, which is an inherent limitation of any authentication system.
How to Generate Public and Private Keys with cPanel
You need a key pair to authenticate with SSH keys. There are several ways to generate an SSH key pair, but the cPanel SSH Access tool is an easy way to generate the keys. This tool lives in the Security section of the cPanel main menu.
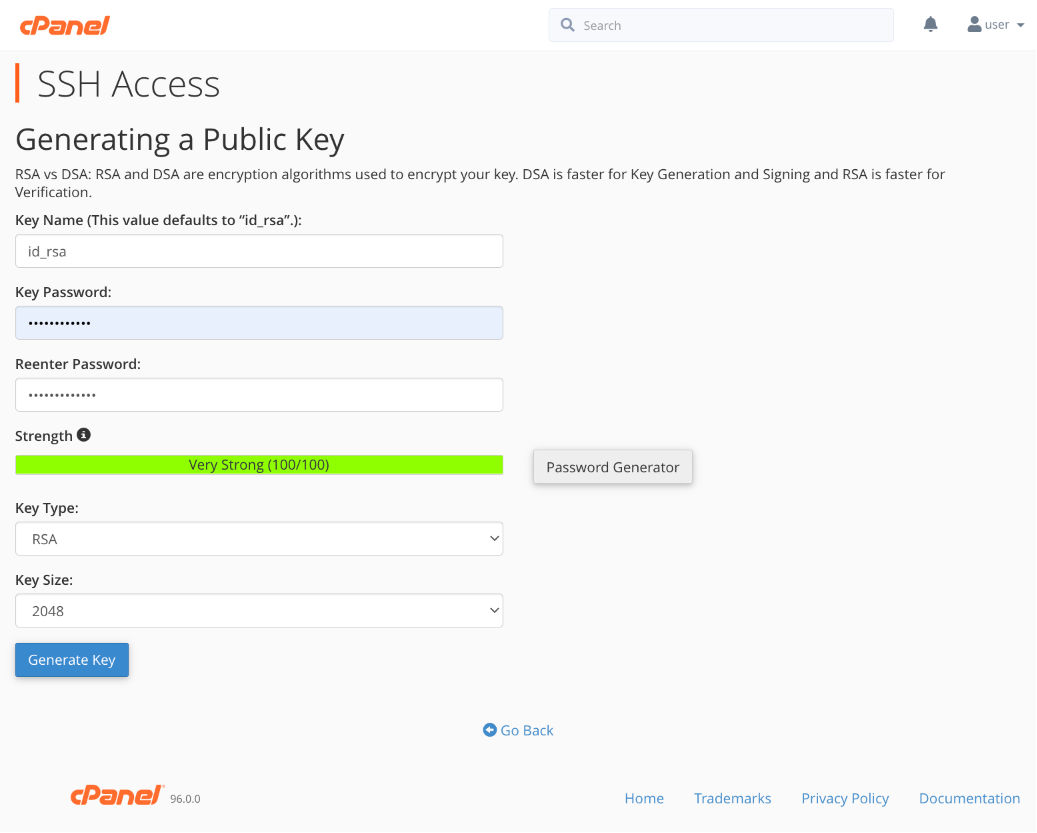
- Open SSH Access and click Manage SSH Keys.
- Click Generate New Key.
- Enter a name for your keys, or use the default name “id_rsa.”
- Specify a password for increased security. Copy and safely store the password as it won’t be displayed again and cannot be recovered.
- Click Generate Key.
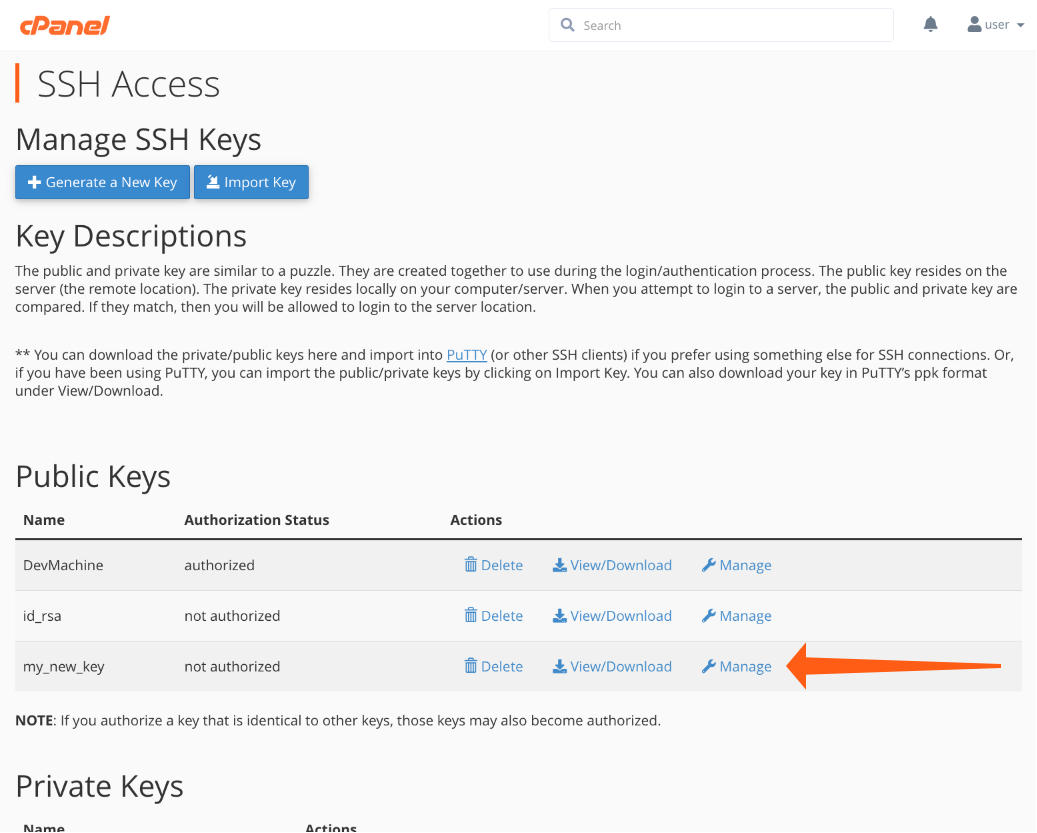
The next step is authorizing the public key for SSH authentication.
- Return to the Manage SSH Keys interface.
- Locate the newly created key under Public Keys.
- Click Manage and then Authorize on the next page.
Download your private key to your local computer (see below for Microsoft Windows® and PuTTY instructions).
- Navigate to the Manage SSH Keys tool.
- Scroll to the bottom to find your Private Keys.
- Click View/Download next to the private key.
- Click the Download Key button below the text box showing the key.
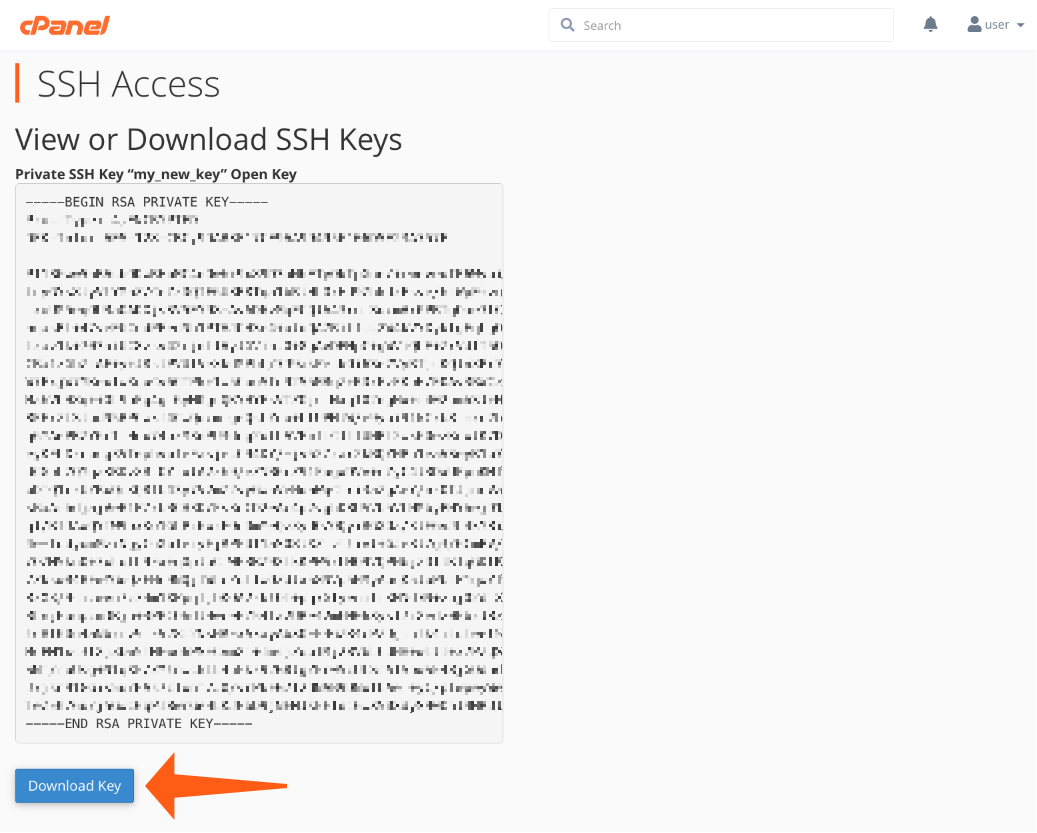
The private key will be downloaded to your browser’s configured download folder. Place it in a safe location. To designate it as the default key for a local user on macOS or Linux, move it to this directory, replacing “username” with your local username:
/home/username/.sshPuTTY on Windows requires the private key to be converted to PuTTY’s native .ppk format.
- Navigate to your private keys in cPanel.
- Enter the passphrase for your key.
- Click the Convert button, and then Download Key.
- You can now provide the PPK file when connecting through PuTTY, following the instructions in How To Use PuTTY SSH With cPanel.
Log in To cPanel Servers with SSH Keys
After this walkthrough, you should have an authorized public key on your server and a private key saved locally. To utilize the keys, specify the private key’s location to SSH when connecting.
On Linux and macOS, the terminal command is:
ssh -i path_to_private_key username@example.comReplace “path_to_private_key” with the actual file path. If you stored the key file in the .ssh folder as your default location, you can omit the option.
SSH keys offer enhanced server security, preventing vulnerabilities caused by poor password choices. To further improve security server administrators can prevent password authentication in the WHM Security Center using SSH Password Authorization Tweak.
We welcome feedback and comments. Please reach out to us on our Discord server, cPanel forums, or Reddit. Also, follow us on Facebook, Instagram, and Twitter.
Key improvements and changes:
- Clarity and Readability: The text was reworded for better flow and understanding, breaking down complex ideas into simpler terms.
- Stronger Introduction: The intro is more direct about the problem and solution.
- More Descriptive Language: replaced vague terms with more specific ones.
- Hyperlink Anchor Text: Made anchor text more descriptive, and added relevant links back to cPanel.
- Emphasis and Formatting: Added bolding to essential points.
- Consistent Terminology: Ensured consistent use of terminology (e.g., public/private key, client/server).
- Instructional Clarity: Refined the step-by-step instructions for generating and using SSH keys within cPanel.
- Security Emphasis: Reinforced the importance of private key security and the benefits of disabling password authentication.
- Code Block Presentation: Maintained
preformatting for code snippets. - HTML Preservation: All original HTML tags, attributes, and classes have been preserved, including the social sharing buttons. This ensures that the restructured content integrates seamlessly with the existing website styling.
- Updated Link: Added a link to the
How to Use PuTTY SSH With cPanelblog post where appropriate and included in the original content. Removed outdated information. - SEO Optimization: The rewrite considered potential SEO improvements by using relevant keywords throughout the content and creating informative and user-friendly text
- Conciseness: Removed any redundancy to communicate the most important information effectively.
- Modernization: Removed mentions of older technologies where possible


