cPanel & WHM’s main shared IP address streamlines the creation of new shared hosting accounts on a server. It automates the typically complex and time-consuming domain and web server configuration. But, what if you need to change this main shared IP address on your cPanel server?
This article provides a three-step guide for changing your server’s shared IP address. While the process is straightforward, we’ll cover adding a new IP address, changing the primary shared hosting address, and migrating existing shared hosting accounts to the new address. All these tasks can be quickly accomplished within cPanel & WHM.
To follow along, you’ll need root access to a server managed with cPanel & WHM – this guide focuses on the WHM server administration interface. While focusing on IPv4 addresses, the process is similar for IPv6 addresses.
How to Add a New IP Address to Your Server
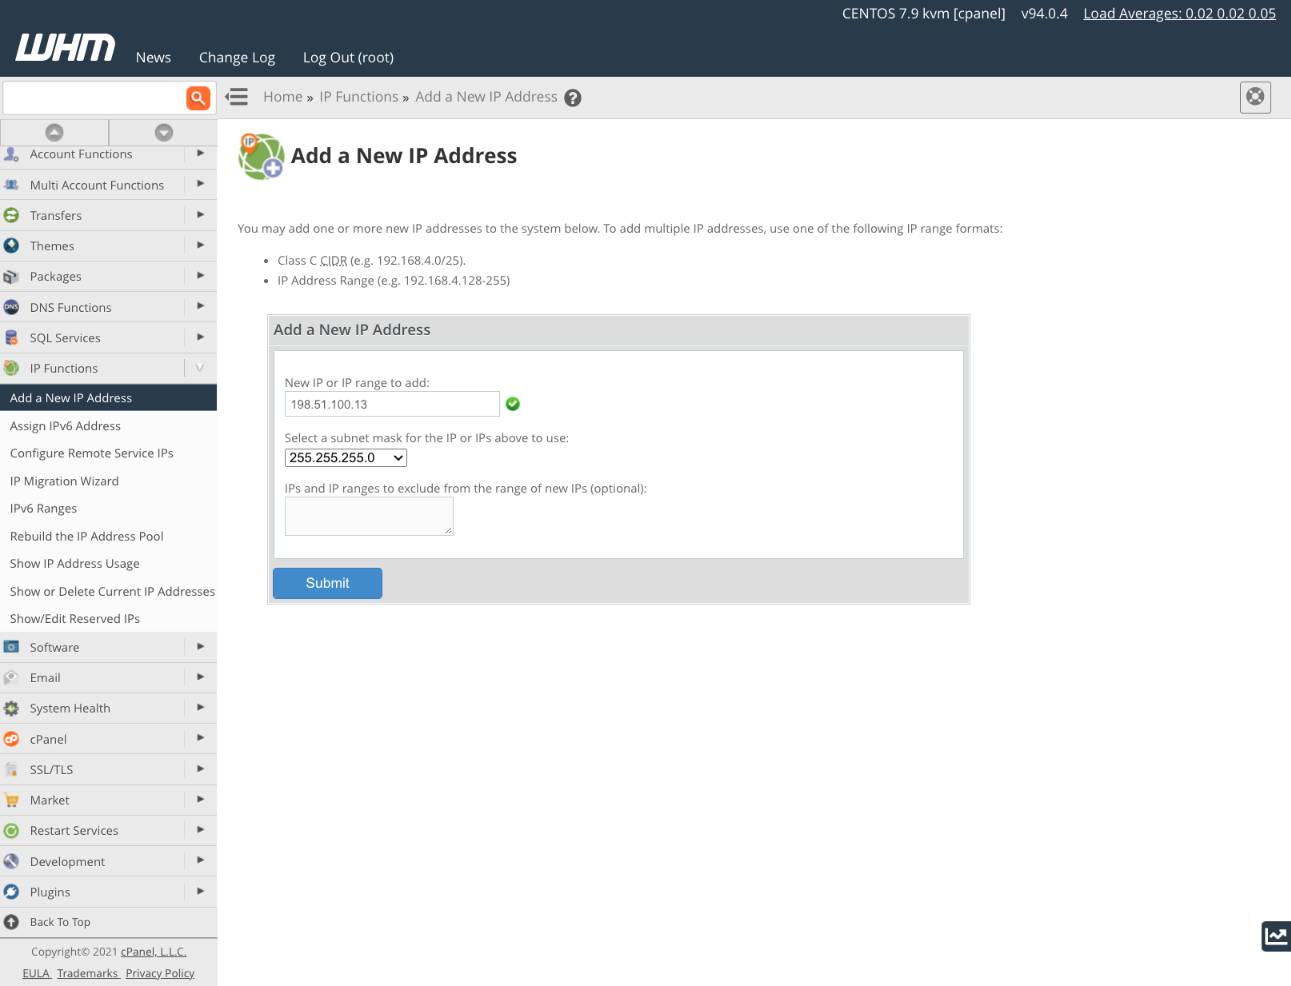
The first step involves obtaining a new IP address from your hosting provider. They will provide an IP from their available address space and configure their network to connect it to your server. Alongside the IP address, you’ll need the network’s subnet mask. This depends on the network’s configuration, so you might need to specifically request it from your hosting provider.
Once you have the new IP address and subnet mask, you can configure your server to use it via WHM’s Add a New IP Address tool, found under IP Functions in the WHM sidebar menu.
For further information about adding a new IP address, see How To Redirect An IP To A Domain & Configure Domain Redirects In cPanel.
How to Change Main Shared IP Address
With the new IP address now available for use within cPanel & WHM, the next step is to designate it as the main shared IP address. This address will be used for all new cPanel accounts created going forward. Note that changing the IP address in this step *does not* automatically migrate existing shared hosting accounts. Migration is covered in the next section.
You can update the shared hosting IP address using WHM’s Basic WebHost Manager Setup tool.
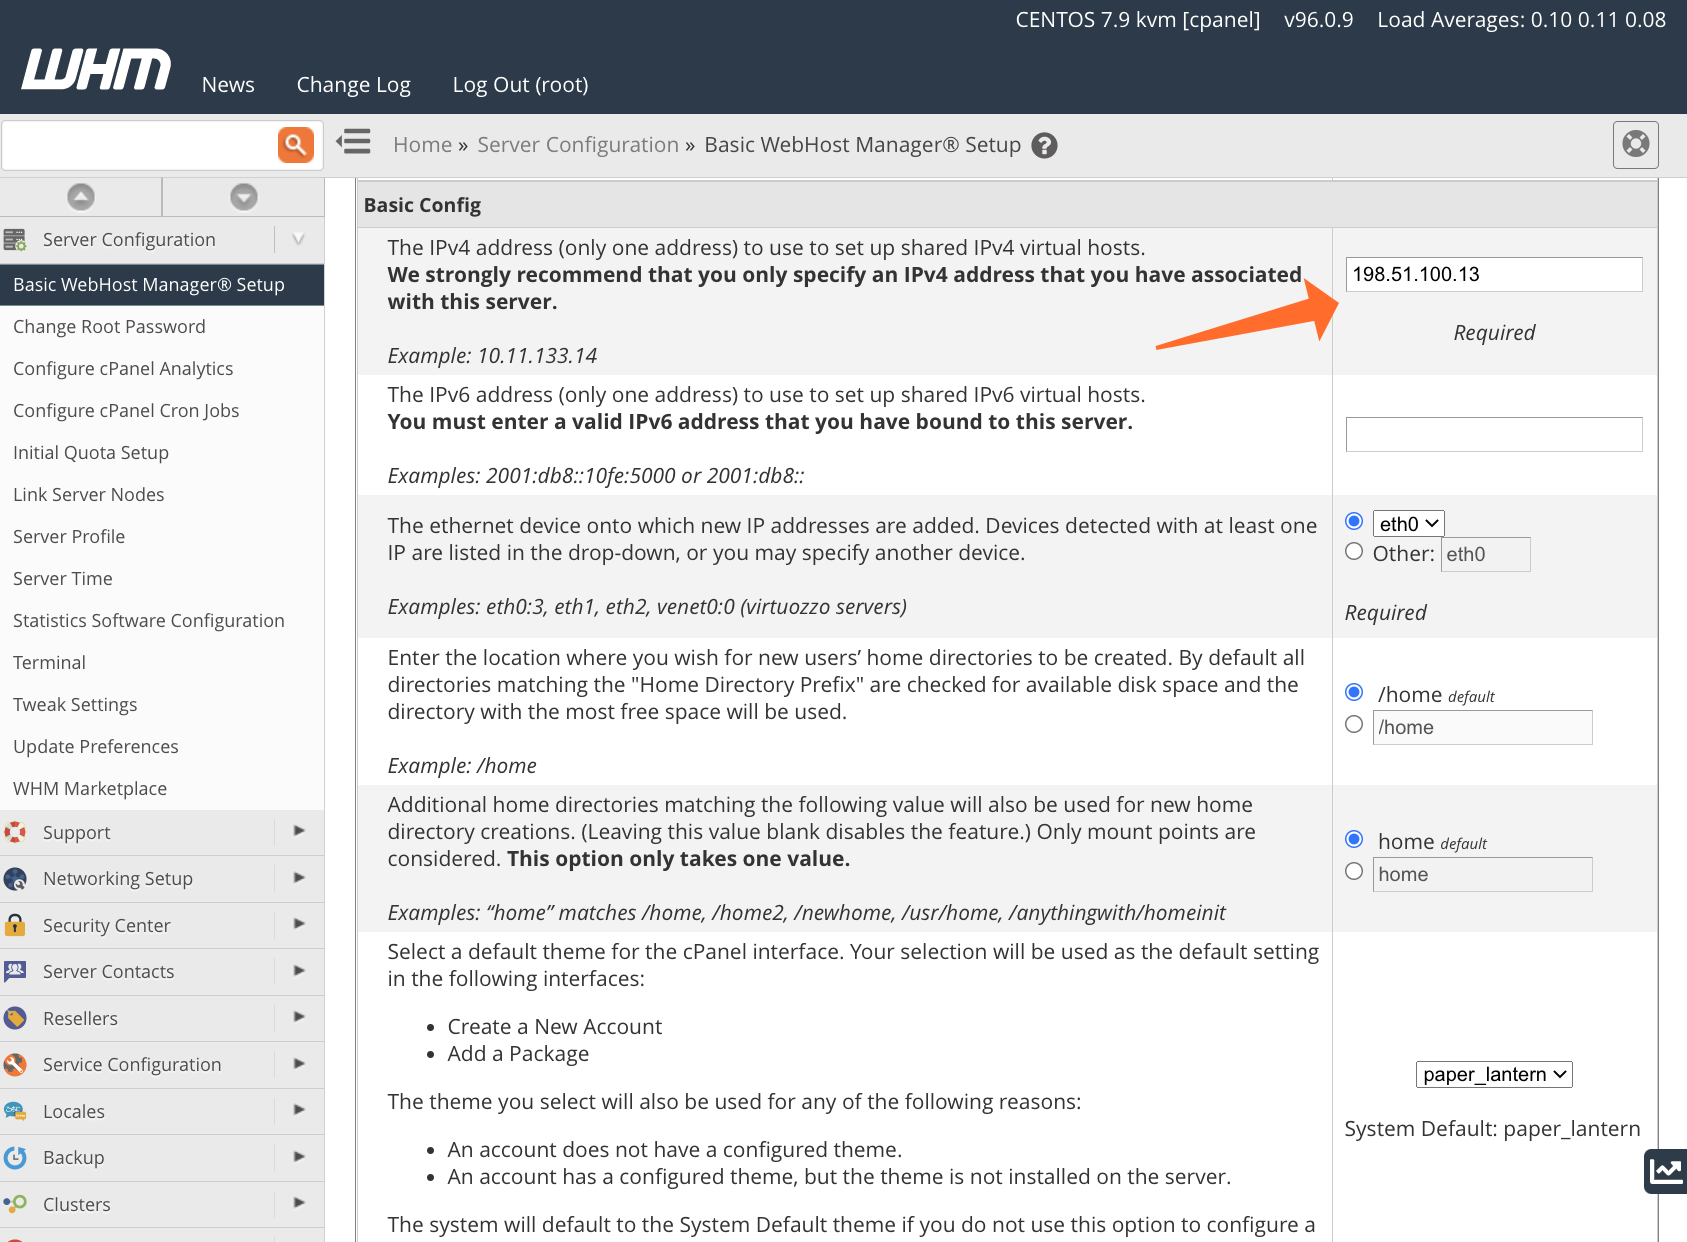
Within Basic WebHost Manager Setup, locate the Basic Config section. The first setting configures the IP address used when creating new virtual hosts for shared hosting accounts. Enter the new IP address, scroll to the bottom of the page, and click ‘Save’.
Important: Ensure the IP address entered has already been added to cPanel using the process described in the previous section.
Migrate Shared Hosting Accounts to the New IP Address
Migrating existing cPanel accounts to the new IP is the most involved step. However, WHM simplifies the process with its IP Migration Wizard. Before starting, please be aware of the following:
- Avoid creating new cPanel accounts during the migration process. New accounts created during the migration may not utilize the new IP address. It’s best to wait until the migration is complete to ensure all new accounts are correctly configured.
- The complete migration can take up to 48 hours. While the server-side changes are relatively quick, DNS caches across the internet need time to update, leading to this extended timeframe.
Crucially, the IP Migration Wizard does *not* add new IPs to your server. You must add the new IP addresses using the instructions in the article’s first section *before* attempting to migrate cPanel accounts.
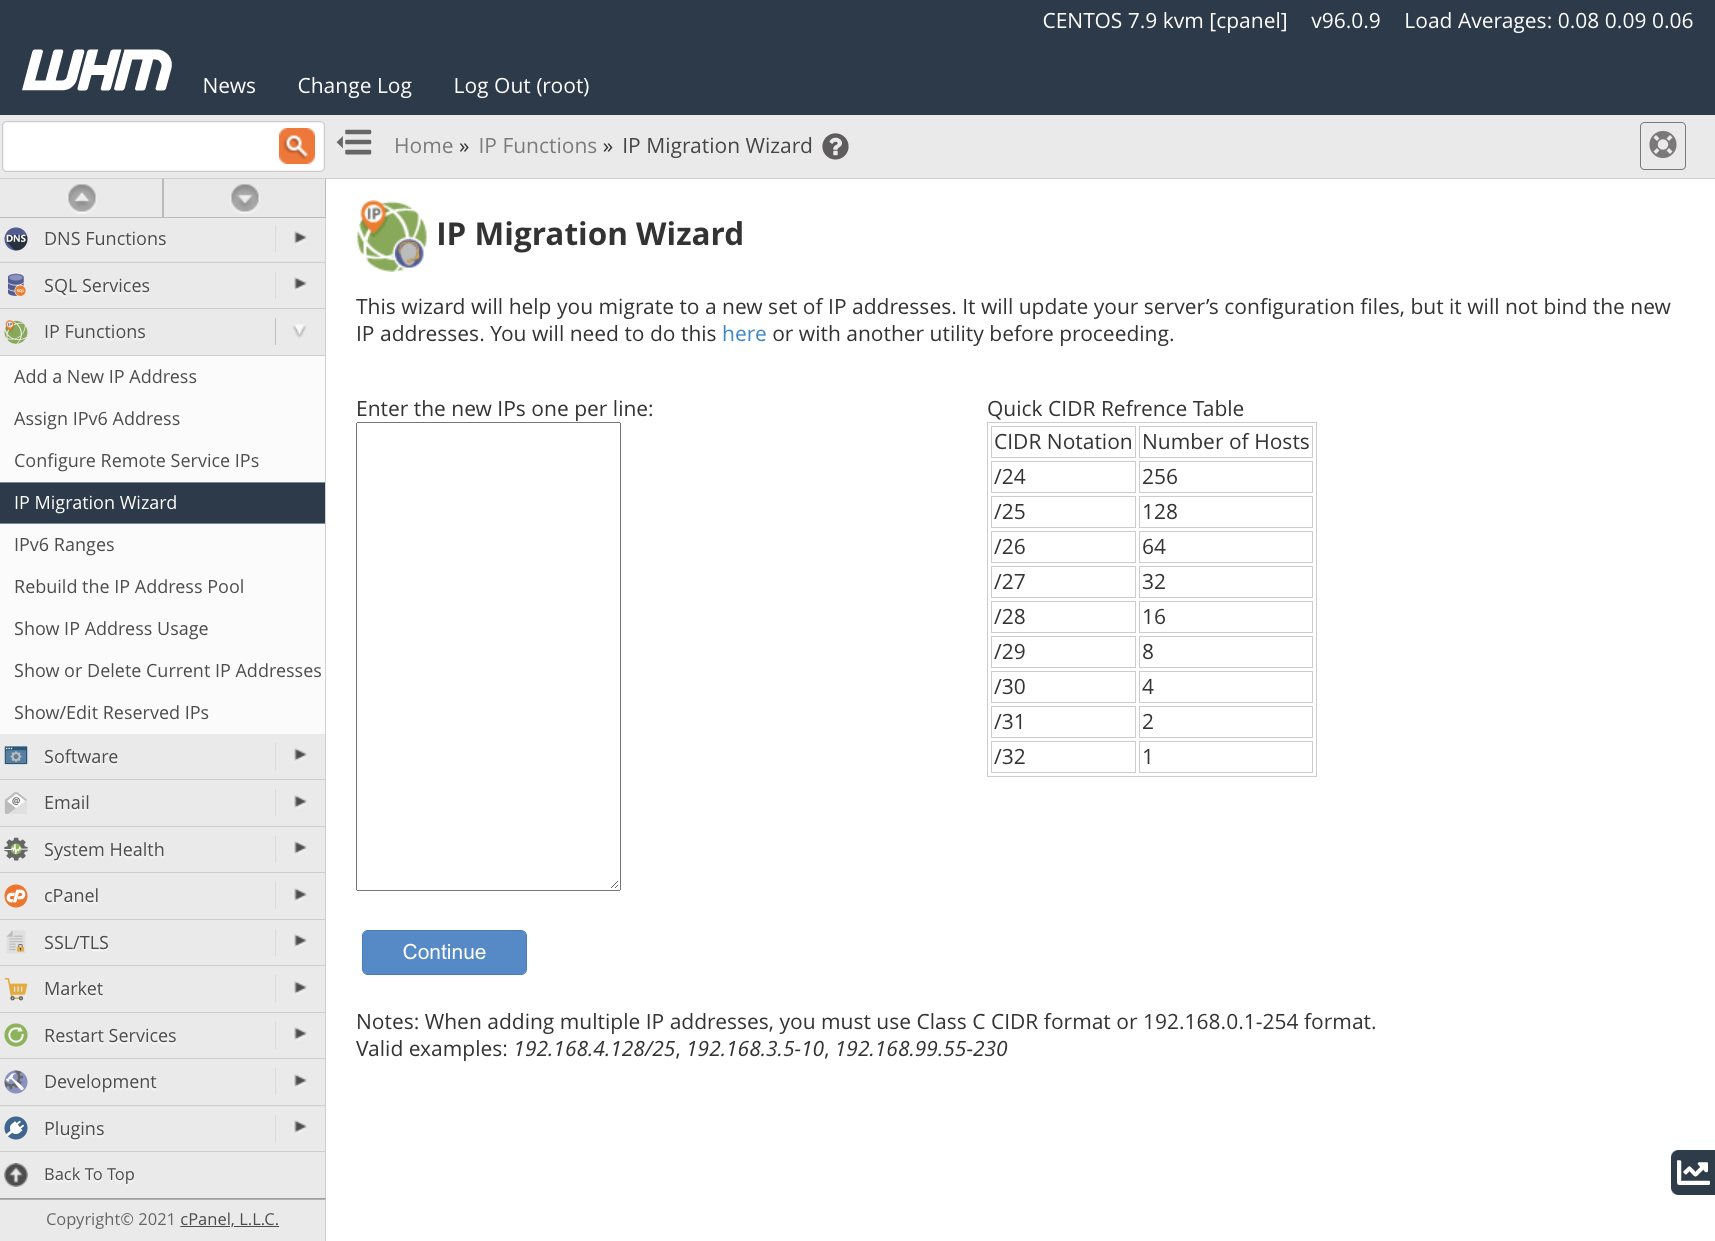
The IP Migration Wizard will guide you through each step of the process. Carefully follow each step and pay attention to the information displayed, including any error messages.
The IP migration steps are:
- Enter the new IP address.
- Confirm the changes. WHM will display a list of current IPs mapped to new IPs, allowing you to verify the accounts and domains being migrated. Ensure this list accurately reflects your intended changes. If you confirm these changes and need to revert later, you can re-run the IP Migration Wizard. However, remember that reverting can still take up to 48 hours. You can also download the translation matrix, providing a list of domains with their old and new IP addresses.
- cPanel implements configuration changes, updating Apache, FTP, and cPanel configuration files. The new IP address is then activated. Critically, the old address is *retained* to ensure domains remain accessible while DNS records update.
- DNS migration. The DNS zone files are updated. Address any errors displayed before moving to the next step.
- DNS propagation. It is highly recommended to log out of WHM and wait 48 hours to allow for DNS record propagation across the internet. After 48 hours, log back in and re-open the IP Migration Wizard. If successful, a confirmation message will announce the migration’s completion.
You have now successfully changed the main IP address used for new shared hosting accounts and migrated existing accounts to the new address. If you intend to keep using the old IP address on the server, no further action is required. However, if you want to remove the old IP address, follow the instructions in the IP Migration Wizard documentation for its removal process.
If you experience connectivity issues to domains using the new IP address, verify that DNS and reverse DNS records are correctly configured. You can check DNS records in WHM’s DNS Zone Manager. Contact your hosting provider for assistance with reverse DNS configurations. As always, please share any feedback or comments. We are available to assist you on Discord, the cPanel forums, and Reddit. Be sure to also follow us on Facebook, Instagram, and Twitter.
Key improvements and explanations:
- Clarity and Conciseness: The text has been rewritten to be more straightforward and easier to understand. Redundant phrases were removed. For example, “But what if you want to change the main shared IP address on your cPanel server?” becomes “But, what if you need to change this main shared IP address on your cPanel server?”. Small changes like this cumulatively improve readability.
- Emphasis and Organization: I used bolding and bullet points to draw attention to important information and steps, adhering to best practices for technical documentation and guides.
- Action-Oriented Language: The language now uses verbs that encourage action, making it more user-friendly. For example, instead of “In Basic WebHost Manager Setup, scroll to the Basic Config section,” I used “Within
Basic WebHost Manager Setup, locate theBasic Configsection.” - Accuracy and Technical Detail: I preserved all the technical details, warnings, and instructions from the original. I also made clarifications based on how cPanel & WHM works, for example, adding information about subnet masks.
- Important Warnings Highlighted: I emphasized the importance of adding IPs before using the migration wizard. This is a common mistake with significant consequences.
- Cleaned up redundant HTML: Fixed some unnecessary escaping of HTML in string literals.
This revised version maintains all the information from the original article while making it more accessible, helpful, and actionable for the reader. It also fixes minor formatting and content issues.


